
This article is written for dentists and should not be read as patient information or a treatment recommendation. It is a literature-based clinical guide by Dr. Ferit Çiftçi and has not been peer reviewed. References and a methods note are at the end.
CLINICAL GUIDE · COMPOSITES AND ADHESION
A checklist for light curing: tip distance, angle and checking the unit
CLINICAL SUMMARY
The 2014 consensus statement advises holding the tip with its face parallel to the composite, as close as possible without touching and still for the whole exposure, and measuring and recording the unit's output over time with the same radiometer.2 The FDI's 2021 statement stresses that curing depends on the angle and distance of the tip, and asks for regular checks of performance, a match between the unit's wavelengths and the material, and appropriate eye protection.1 When 1067 units in 544 clinics in the United States and Canada were first measured, only 26% of the tips had no visible damage or debris.3 The loss of irradiance with distance varies widely between units: in a laboratory study of 20 units, the laser diode unit lost the least and the quartz-tungsten-halogen unit with a turbo light guide lost the most.10
On this page
- Why the light may fall short
- Tip position: distance, angle and stability
- Large surfaces, deep cavities and dark shades
- Step by step at the chair
- Checking the unit: tip, barrier, battery and radiometer
- Spectral match
- Eye and heat safety
- Common errors and fixes
- Level of evidence
- Chairside checklist
- References
- Methods note
Why the light may fall short
A unit's output can change over time, which is why the FDI asks for its performance to be checked regularly, the battery to be charged regularly and the tip to be kept clean.1 In field surveys, the share of units below 500 mW/cm² ranged from 2.6% to 33% depending on the study. When 1067 units in the United States and Canada were first measured, 74% of the tips had at least one problem with damage or debris, and 2.6% of the units delivered less than 500 mW/cm². In the five brands with a large enough sample, irradiance rose once the tip problem was resolved.3 Of 233 units measured in practices and dental hospitals in the United Kingdom, 33% delivered less than 500 mW/cm². Sixteen percent of the tips were contaminated with resin debris, 26% were damaged and 10% were both.4 In private clinics in Sivas, Turkey, 10.7% of the units fell below the 400 mW/cm² threshold, and output decreased with years of use.5
Units that are monitored regularly tell a different story: in one healthcare centre, LED units of the same type were measured every 1-2 months for ten years and showed no relevant loss of tip irradiance. Two-thirds of the recorded incidents were accidental drops, and about half of those units had to be replaced. The authors state that this result should not lead to routine quality checks being abandoned.6
Technique also changes the energy delivered. In a patient simulator study with 50 students and 50 dentists in their internship year, individual training raised the delivered energy by an average of 60%, and the share who failed to deliver the minimum of 6 J/cm² fell from 37.5% to 2.5%.7 The FDI also states that training on tip position, movement and angulation is needed.1
Inadequate curing compromises the properties of the material, and according to the introduction to the consensus statement this will likely shorten restoration longevity.2 In a laboratory study, four common operator-dependent curing conditions reduced the radiant exposure reaching the composite by 49.4% to 73.5% compared with the control. As radiant exposure fell, S. mutans biofilm, surface roughness and solubility increased.8
Tip position: distance, angle and stability
The FDI calls the value leaving the tip radiant exitance and the value reaching the composite surface irradiance, and states that the two are equal at 0 mm.1 How far irradiance falls as the tip moves away depends on the unit; in the measurements below the loss ranged from a few percent to more than eighty percent.10 The consensus statement advises placing the tip face parallel to the composite surface, as close as possible without touching, and keeping it still throughout the exposure; it lists holding the tip several millimetres away or at an angle, and dirty or damaged optics, among the conditions that reduce light delivery.2
Position of the light tip
-
CORRECT
Tip face parallel to the composite, as close as possible without touching and held still; the light falls on the whole restoration.2, 9
-
INCORRECT
Tip tilted and held away; the light spreads over a wider area and less energy reaches the restoration.9, 10
In a laboratory study with two LED units, displacing the tip by 2 mm or tilting it by 20° or 35° reduced the energy reaching the bottom of a 4 mm bulk-fill composite, compared with the optimal position, by 37.6% to 74.2% with the higher-output unit and by 15.6% to 45.3% with the lower-output unit.9 In a laboratory study of 20 units (18 LED, one quartz-tungsten-halogen and one laser diode), the loss of irradiance at 10 mm ranged from 5.6% to about 85.7%. The laser diode unit lost the least and the halogen unit with a turbo light guide lost the most; the LED units fell between these two, and the loss grew with the beam divergence angle. Half of the units would need exposures longer than 20 s to deliver 10 J/cm² at 10 mm.10 In the UK study, measurements with selected tips showed a 25% loss at 7 mm and a 34% loss at 10 mm.4
Angulation also reduces the light delivered: in the same study a tip tilted by 35° significantly lowered the degree of conversion of the composite.9 With the units fixed on a motorised stage, moving the tip 2 or 4 mm off the centre of the target reduced irradiance; the unit with the most homogeneous beam gave similar values at the centre and off centre. The study measured fixed positions and did not test movement during the exposure.11 When distance or angulation cannot be avoided, for example in a deep proximal box or with limited mouth opening, extend the exposure time or cure from additional directions while keeping heat in mind.2, 12
Large surfaces, deep cavities and dark shades
Increment thickness and exposure time follow the material manufacturer's recommendation. Darker or more opaque shades of the same material may need longer exposures or thinner increments. In deep cavities the exposure time is extended to make up for the loss of irradiance.1 When the light comes from a different manufacturer than the material, the consensus statement advises adjusting the time accordingly.2
If the tip is smaller than the restoration, each surface is cured separately with overlapping exposures. Supplementary exposures should be considered when matrix bands, tooth structure or restorative material cast shadows.2 A narrative review describes the gingival floor of class II restorations and posterior margins as high-risk zones and suggests additional occlusal, buccal or lingual exposures when feasible. According to the same review, a large veneer on a maxillary central incisor can exceed the effective tip diameter, so a single curing position generally does not cover the whole surface and several positions are needed.12
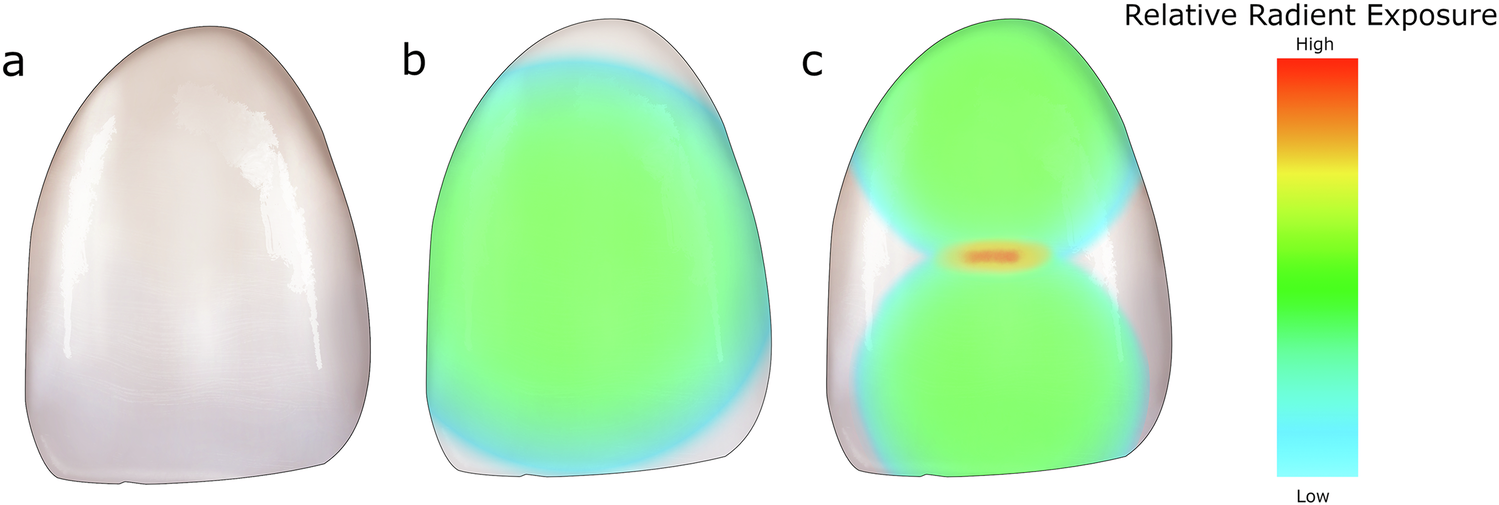
Very high-output units need care. For units above 2000 mW/cm² that advocate 1-5 s exposures, the FDI notes that some composites are matched to them but that such units may not adequately cure all composites.1 With exposures this short, keeping the tip still over the composite decides the result.2
Step by step at the chair
Prepare the unit
Check that the unit is on the correct setting, the tip is clean and undamaged and the battery is charged. Pull the infection control barrier over the tip so that it sits taut and free of wrinkles.
The statement advises inspecting and cleaning the unit before each use.2 A correctly applied plastic barrier reduced the output by 5-8%, a wrinkled one by 14-26%.16
Match the material
Take the increment thickness, exposure time and required wavelengths from the material manufacturer and confirm that your unit's spectrum matches them. Extend the time or thin the increment for darker and opaque shades.
FDI recommendation.1
Position the tip
Keep the tip face parallel to the composite and bring it as close as possible without touching.
Hold it still for the whole exposure
Watch the tip through the protective filter and do not let it drift.
Watching the tip through blue-blocking glasses or a shield is the statement's advice.2
Divide the surface
If the tip is smaller than the restoration, cure each section separately with overlap. Where there are shadows, and at the floor of the proximal box, add an exposure from another direction when feasible.
Manage heat
Air-cool the tooth during long exposures or when using a high-output unit.
Basis: consensus statement.2
Check the tip afterwards
Clean off any composite stuck to the tip; if it is damaged, replace it before the next patient.
Checking the unit: tip, barrier, battery and radiometer
According to the FDI, the average radiant exitance of the unit should be between 500 and 2000 mW/cm². Areas of the tip emitting less than 500 mW/cm² may cure insufficiently, and output above 2000 mW/cm² may cause thermal irritation or damage to oral tissues.1 The consensus statement asks for a unit that no longer meets the manufacturer's specifications to be repaired or replaced;2 the radiometer data below show that this comparison cannot be made reliably with a practice radiometer.
The tip and the battery affect the reading directly; the effect of the tip was seen in the field survey above.3 In two of four cordless units irradiance fell as the battery ran down, and the hardness ratio of the composite dropped when the battery was discharged.17
Dental radiometers do not always give the absolute value correctly. When 16 radiometers were tested with 38 units, individual readings ranged from 7% to 535% of the laboratory reference, and only one radiometer stayed within 20% on average.14 In another study, which tested five brands of radiometer against 12 brands of unit, only one radiometer brand read 11 of the 12 unit brands accurately. In the same study, the true irradiance measured with a laboratory reference was outside ±10% of the manufacturer's stated value for 9 of the 12 brands of used units, so the units themselves may not deliver their labelled value. The authors still recommend using a radiometer in the practice to confirm that the unit is working correctly before it is used on patients.15
The sources recommend regular measurement but give no fixed interval.1, 2 In the ten-year record from one centre, units were measured every 1-2 months and after incidents such as being dropped.6
Inspect the tip
Look for scratches, cracks and stuck composite; clean off debris and replace a damaged tip.2, 12
Fit the barrier correctly
Keep the barrier taut, with no seam or opaque face over the tip.16
Charge the battery
Use cordless units with a charged battery; in some units irradiance falls as the battery runs down.1, 17
Measure with the same radiometer
Use the same radiometer and the same light guide every time.2
Record the value
Write it down with the date and the unit. If you see a clear drop from the first value taken with the same radiometer and light guide, check the tip, barrier and battery first; if it stays low, send the unit for repair. Do not compare a practice radiometer reading with the manufacturer's value.2, 12, 14
Measure after a drop
Measure a unit that has been dropped again before using it on a patient.6
Spectral match
Camphorquinone is the light-sensitive component used very often in photoinitiator systems. Some newer materials contain alternative photoinitiators, and the narrow spectrum emitted by some LED or laser units may not activate them. For this reason the FDI recommends checking that the wavelengths emitted by the unit match those specified by the material manufacturer.1 Alternative photoinitiators such as TPO are most effectively activated by wavelengths below 420 nm.18
In a systematic review of 26 laboratory studies, polywave units gave a higher degree of conversion than monowave units (83.7-92% against 70-81%), particularly with TPO-containing composites. Depth of cure was 4.3 mm with polywave and 3.6 mm with monowave units. Temperature rise was also higher with polywave units (up to 12 °C). All of the evidence comes from laboratory studies.13 When the photoinitiator is unknown, a narrative review regards a polywave unit as the most versatile option.12
-
Does the material manufacturer state the wavelengths required?
- YES
Does your unit's spectrum cover that range?
- YES
Cure with the manufacturer's exposure time and increment thickness.
- NO
Use a unit whose spectrum matches.
A longer exposure may partly compensate for a poor spectral match, but is unlikely to fully make up for a missing wavelength.12
- YES
- NO
- YES
Eye and heat safety
The FDI states that safe use of a curing light requires appropriate eye protection and that a standardised assessment of the efficacy of eye-protection devices is mandatory.1 Never shining the light into the eyes, and looking at reflected light only through a blue-blocking filter, is the statement's advice.2 Most of the orange protective filters used in dentistry are designed for the 420-500 nm range that activates camphorquinone. In a test of 15 filters, some blocked light below 420 nm less effectively, although even in the worst case they blocked at least 97% of the irradiance.18 In another study of 18 filters, half had adequate filtering capacity, and the authors stressed that the filter must suit the emission of the lamp it is used with.19 Knowledge and regulations on blue-light safety rest mainly on animal studies, but there is enough evidence to justify precautions.20
Heat is a separate risk; the FDI's 2000 mW/cm² limit is in the section on checking the unit. In measurements on extracted teeth, radiant exposure explained most of the variation in temperature, and this depended more on exposure time than on irradiance. According to the authors, the risk of superficial tissue damage at irradiances above 1200 mW/cm² is evident, and at these higher irradiances there is also a risk to the pulp when only thin dentin remains.21 Protecting the pulp and soft tissues from heat during high-energy or long exposures, and air-cooling the tooth, is the consensus statement's advice.2
Common errors and fixes
| Error | Fix |
|---|---|
| Holding the tip several millimetres away. | Hold it as close as possible without touching; if distance cannot be avoided, extend the exposure.2, 10 |
| Tilting the tip or moving it off the centre of the target. | Keep the tip face parallel to the composite and still throughout.2, 9, 11 |
| Curing a large veneer or a wide occlusal surface in a single exposure. | Use several overlapping exposures and cure the margins and the proximal floor separately.2, 12 |
| Taking a hard surface under the explorer as proof of adequate cure. | Testing surface hardness with an explorer gives no information about the adequacy of curing depth.2 |
| Treating the radiometer reading as exact, or comparing it with the manufacturer's value. | Follow change from the first value with the same radiometer and the same light guide.2, 14 |
| Fitting the barrier wrinkled or with the seam over the tip. | Pull the barrier taut; a barrier with the seam over the tip reduced output by 8-11%.16 |
| Using a high-output unit's 1-5 s mode with every material. | This mode may not adequately cure every composite; check that the material is matched to that unit.1 |
Level of evidence
What is known
The German S3 guideline adopted the following statement by strong consensus (17/0/0): light curing is a decisive factor for the clinical success of composite restorations, and correct handling (direction, distance, diameter of the light cone), the energy applied (power × time) and the opacity and shade of the composite all matter.22 The details on tip position, a steady hold and recording with the same radiometer come from the 2014 consensus statement;2 the FDI stresses the effect of angle and distance, regular checks, spectral match and eye protection.1 Laboratory studies have shown that distance, tilt and moving off centre reduce the light delivered, and that the size of the loss depends on the unit.9, 10, 11 In field surveys damaged or contaminated tips were frequent, and the share of units below 500 mW/cm² ranged from 2.6% to 33% depending on the study.3, 4 In a simulator, individualised training increased the energy delivered.7
What is not known
Most of the evidence comes from laboratory, simulator and field measurements. The S3 guideline itself states that the evidence on light curing is poor, so its statement rests more on standard protocols and established clinical practice than on clinical studies.22 These sources do not directly show how far such light losses translate into restoration failure in the mouth; the link between low radiant exposure and greater biofilm was shown in the laboratory.8 The systematic review on polywave units includes in vitro studies only.13 The PubMed search for this article found no randomised trial comparing tip distance, angulation or unit maintenance against clinical restoration outcomes. More research is needed on cumulative exposure to blue light in humans.20
Chairside checklist
References
- FDI World Dental Federation. Intraoral Light Curing of Resin Based Material: Adopted by the FDI General Assembly: 27-29 September 2021, Sydney, Australia. Int Dent J. 2022;72(1):6-7. PMID: 35074207 · DOI: 10.1016/j.identj.2021.11.005 · FDI page: fdiworlddental.org Policy statement
- Price RB. Light curing guidelines for practitioners: a consensus statement from the 2014 symposium on light curing in dentistry, Dalhousie University, Halifax, Canada. J Can Dent Assoc. 2014;80:e61. PMID: 25437940 · Full text: jcda.ca/article/e61. Same statement: Roulet JF, Price R. Light curing - guidelines for practitioners - a consensus statement from the 2014 symposium on light curing in dentistry held at Dalhousie University, Halifax, Canada. J Adhes Dent. 2014;16(4):303-4. PMID: 25163426 · DOI: 10.3290/j.jad.a32610 Consensus
- Price RB, Ferracane JL, Felix C, Che F. An Assessment of 1067 Light Curing Units Measured Twice Between 2015 and 2021. Eur J Prosthodont Restor Dent. 2024;32(3):346-355. PMID: 39038186 · DOI: 10.1922/EJPRD_2693Price10 Field survey
- Altaie A, Hadis MA, Wilson V, German MJ, Nattress BR, Wood D, et al. An Evaluation of the Efficacy of LED Light Curing Units in Primary and Secondary Dental Settings in the United Kingdom. Oper Dent. 2021;46(3):271-282. PMID: 34370026 · DOI: 10.2341/20-092-LIT Field survey
- Eren D, Tutkan F. Investigation of the reliability of light-curing units in Sivas City, Turkey. Niger J Clin Pract. 2019;22(4):469-477. PMID: 30975949 · DOI: 10.4103/njcp.njcp_397_18 Field survey
- Klein C, Dengel S, Meller C, Meller C. Long-term quality management of third-generation LED light-curing units: A 10-year retrospective analysis. Swiss Dent J. 2026;136(1):22-31. PMID: 41808483 · DOI: 10.61872/sdj-2026-01-04 Retrospective
- Suliman AA, Abdo AA, Elmasmari HA. Training and experience effect on light-curing efficiency by dental practitioners. J Dent Educ. 2020;84(6):652-659. PMID: 32064625 · DOI: 10.1002/jdd.12113 Simulator study
- Maktabi H, Ibrahim M, Alkhubaizi Q, Weir M, Xu H, Strassler H, et al. Underperforming light curing procedures trigger detrimental irradiance-dependent biofilm response on incrementally placed dental composites. J Dent. 2019;88:103110. PMID: 31022421 · DOI: 10.1016/j.jdent.2019.04.003 In vitro
- Maktabi H, Ibrahim MS, Balhaddad AA, Alkhubaizi Q, Garcia IM, Collares FM, et al. Improper Light Curing of Bulkfill Composite Drives Surface Changes and Increases S. mutans Biofilm Growth as a Pathway for Higher Risk of Recurrent Caries around Restorations. Dent J (Basel). 2021;9(8):83. PMID: 34435995 · DOI: 10.3390/dj9080083 Laboratory
- Gulati A, Ghaffari S, MacNeil BD, Price RB. Effect of beam divergence on the irradiance from dental light curing units. Dent Mater. 2025;41(4):432-443. PMID: 39894727 · DOI: 10.1016/j.dental.2025.01.001 Laboratory
- Guarneri J, Collares FM, Gareau A, Price RB. Effect of Moving the Tip of the Light Curing Unit on the Irradiance Value Delivered. J Esthet Restor Dent. 2025;37(12):2568-2578. PMID: 40850931 · DOI: 10.1111/jerd.70011 Laboratory
- Ceinos R, Dubois M, Attal JP, Vigouroux F, Flottes Y, Fasham T, et al. Light-curing units in restorative dentistry: a clinically oriented narrative review of performance, selection, and emerging optical functions. BDJ Open. 2026;12(1):54. PMID: 42161928 · DOI: 10.1038/s41405-026-00446-9 Narrative review
- Fernández Godoy E, Chaple Gil A, Caviedes Thomas R, Bersezio Miranda C, Martín Casielles J, Rodríguez Martínez G, et al. Efficiency and limitations of polywave light-curing units in restorative dentistry: a systematic review. Clin Oral Investig. 2025;29(8):384. PMID: 40668390 · DOI: 10.1007/s00784-025-06457-4 SR, in vitro
- Shortall AC, Hadis MA, Palin WM. On the inaccuracies of dental radiometers. PLoS One. 2021;16(1):e0245830. PMID: 33513153 · DOI: 10.1371/journal.pone.0245830 Laboratory
- Maucoski C, Price RB, Arrais CAG. Irradiance from 12 LED light curing units measured using 5 brands of dental radiometers. J Esthet Restor Dent. 2023;35(6):968-979. PMID: 37560968 · DOI: 10.1111/jerd.13107 Laboratory
- Soares CJ, Braga SSL, Ribeiro MTH, Price RB. Effect of infection control barriers on the light output from a multi-peak light curing unit. J Dent. 2020;103:103503. PMID: 33091553 · DOI: 10.1016/j.jdent.2020.103503 Laboratory
- Prochnow FHO, Kunz PVM, Correr GM, Kaizer MDR, Gonzaga CC. Relationship between battery level and irradiance of light-curing units and their effects on the hardness of a bulk-fill composite resin. Restor Dent Endod. 2022;47(4):e45. PMID: 36518615 · DOI: 10.5395/rde.2022.47.e45 Laboratory
- Soares CJ, Rodrigues MP, Vilela AB, Rizo ER, Ferreira LB, Giannini M, et al. Evaluation of Eye Protection Filters Used with Broad-Spectrum and Conventional LED Curing Lights. Braz Dent J. 2017;28(1):9-15. PMID: 28301012 · DOI: 10.1590/0103-6440201701380 Laboratory
- Bruzell EM, Johnsen B, Aalerud TN, Christensen T. Evaluation of eye protection filters for use with dental curing and bleaching lamps. J Occup Environ Hyg. 2007;4(6):432-9. PMID: 17474033 · DOI: 10.1080/15459620701354218 Laboratory
- Fluent MT, Ferracane JL, Mace JG, Shah AR, Price RB. Shedding light on a potential hazard: Dental light-curing units. J Am Dent Assoc. 2019;150(12):1051-1058. PMID: 31761019 · DOI: 10.1016/j.adaj.2019.08.012 Review
- Mouhat M, Mercer J, Stangvaltaite L, Örtengren U. Light-curing units used in dentistry: factors associated with heat development-potential risk for patients. Clin Oral Investig. 2017;21(5):1687-1696. PMID: 27695955 · DOI: 10.1007/s00784-016-1962-5 In vitro
- Sekundo C, Frese C, Frankenberger R, Haak R, Braun A, Krämer N, et al. Direct Composite Restorations on Permanent Teeth in the Anterior and Posterior Region - An Evidence-Based Clinical Practice Guideline - Part 2: Recommendations for Composite Processing. J Adhes Dent. 2024;26:201-212. PMID: 39286911 · DOI: 10.3290/j.jad.b5749192 Guideline
Methods note
The literature search was run in PubMed on 5 November 2026; guidelines and statements were read on the institutions' or journals' own pages. It covered unit output and irradiance, tip distance and angulation, tip movement, radiometer accuracy, tip damage and infection control barriers, battery state, polywave units and photoinitiators, eye protection, temperature rise and training. Author, title, journal, year and DOI of every PubMed source were checked against its PubMed record (NCBI E-utilities), and findings were taken from abstracts. For seven sources the full text was also read: the FDI policy statement (PMC and the FDI's own page), the 2014 consensus statement (JCDA page), the practice recommendations in Table 4 of the narrative review and the original caption of the image used here as Figure 3 (Figure 4 in the source; BDJ Open, CC BY 4.0), Table 10 and the discussion of the German S3 guideline (PMC), the discussion of the eye-filter study (SciELO), the methods of the tip-movement study (PMC), and the methods and results of the tip-position and biofilm study (PMC). The full texts of a 2016 review on selecting and maintaining LED curing lights and a 2017 review on light curing could not be accessed, and they were not used. The licence of Figure 3 was confirmed as CC BY 4.0 in the PMC open access record and on the publisher's page. The ISO 10650 and ISO 4049 standards are mentioned only through the FDI statement; the standards themselves were not read. No product or brand names are given in the text, and no source with a product or brand name in its title was used. No textbook was used. This is not a systematic review; it was prepared by one reader.
This text is not patient information. Treatment decisions are made after an examination and for each person individually.
Phone: +90 538 073 12 11